Nhận diện hành động của người với Deep Learnin
Nhận diện hành động của người với Deep Learnin
Chào mọi người, mình là T, đến từ team ITNavi! Human Action Recognition (HAR) là một quá trình sử dụng những cảnh quay trong video để nhận diện, được phân loại các hành động khác nhau được thực hiện bởi người trong video đó. Nó được ứng dụng rất rộng rãi trong lĩnh vực như giám sát, thể dục, thể thao, ... Giả sử, nếu bạn muốn tạo một ứng dụng dạy học Yoga trực tuyến. Trước tiên, bạn cần phải quay các video hướng dẫn để người học theo dõi và làm theo. Sau đó, mỗi người học tự tập và quay lại video của chính mình. Họ đăng và gửi các video đó lên ứng dụng của bạn. Dựa vào video nhận được, ứng dụng của bạn có thể đánh giá được mức độ chính xác trong mỗi động tác của người học. Từ đó đưa ra gợi ý cải thiện cho họ, ... Thật tuyệt vời phải không?
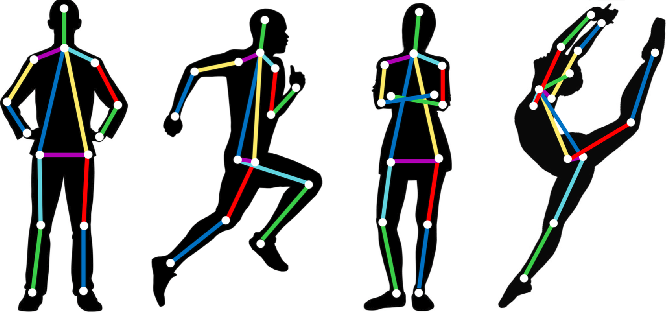
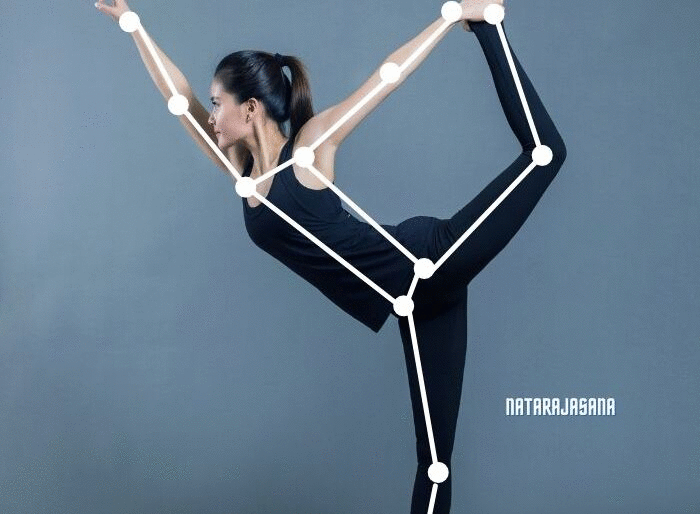 Hình 1 - Ví dụ về Human Pose trong bộ môn YOGA.Source: learnopencv.com
 Trong bài này, chúng ta sẽ cùng nhau tạo ra những model để nhận diện một số hành dộng của người, sử dụng pose estimation, mạng LSTM. Pytorch_Lightning sử dụng trong bài này.
1. Tổng quan sơ đồ kiến trúc
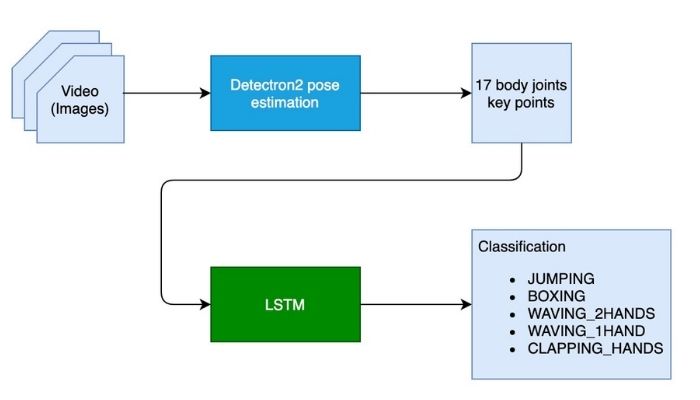 Hình 2 - Kiến trúc tổng quát bài toán nhận diện Human Pose.
Để phân loại một hành động nào đó, trước tiên chúng ta cần xác định được vị trí các bộ phận cơ thể khác nhau trong mọi khung hình đã, sau đó phân tích chuyển động các bộ phận đó theo thời gian. Bước đầu tiên đạt được bằng cách sử dụng Detectron2, nó xuất ra theo tư thế của cơ thể (17 Keypoints) sau khi quan sát một khung hình trong video.Bước thứ hai là ta phân tích chuyển động của cơ thể theo thời gian và đưa ra các dự đoán được thực hiện bằng mạng LSTM. Đầu vào đó là các Keypoints từ một chuỗi khung được, đầu ra là loại hành đồng được dự đoán.
2. Chuẩn bị dữ liệu
Đối với ứng dụng này thì chúng ta chỉ cần huấn luyện mạng LSTM để phân loại các hành động, còn phần Pose Estimation chúng ta sẽ sử dụng pre-trained có sẵn cung cấp bởi Detectron2.Bộ dữ liệu được dùng để huấn luyện mạng LSTM được tạo thành bằng cách sử dụng OpenPose trên các video tập dữ liệu Berkeley Multimodal Human Action Database (MHAD). Sử dụng cách thức tương tự giúp chúng ta có thể tạo ra bộ dữ liệu của riêng mình. Download bộ dữ liệu tại đây. Nó có bao gồm 6 hành động: JUMPING, JUMPING_JACKS, BOXING, WAVING_2HANDS, WAVING_1HAND, CLAPPING_HANDS.
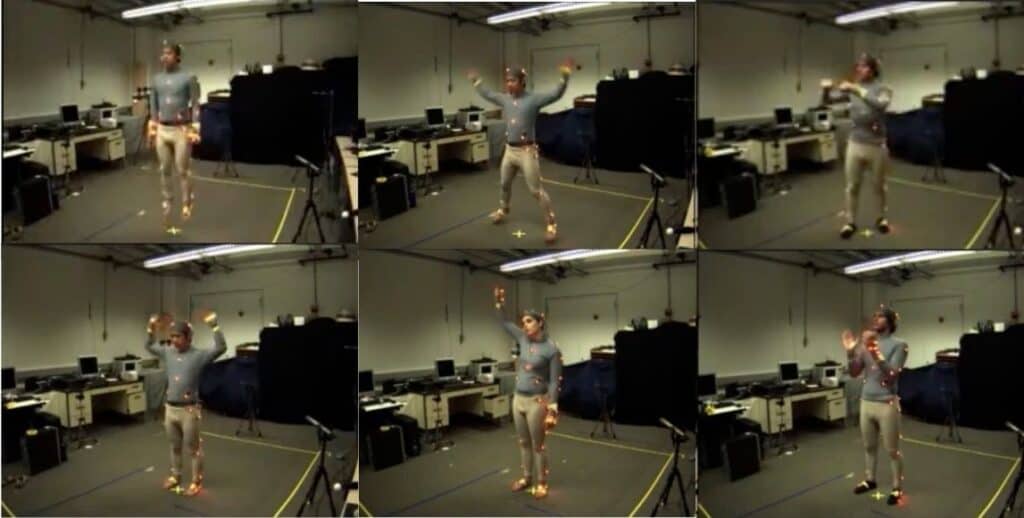
 Hình 3 - Minh họa 6 hành động trong bộ dữ liệu MHAD.Source: learnopencv.com
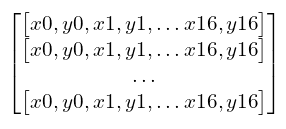
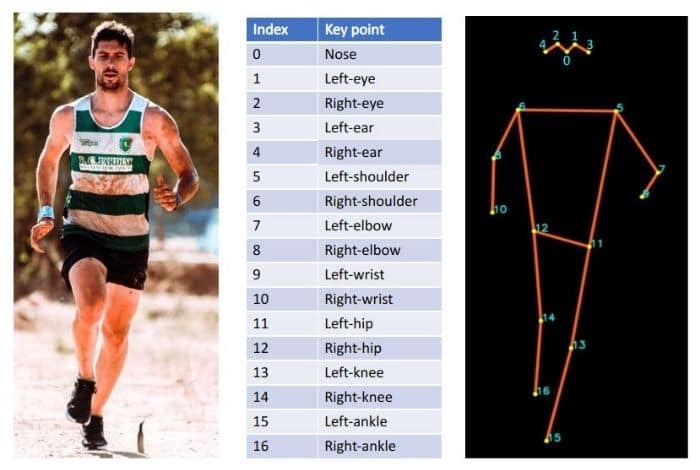
 Training Data bao gồm chuỗi 17 Keypoints kết hợp với một nhãn tương ứng. Mỗi Keypoint lại là một cặp tọa độ (x,y).
 Hình 4 - Minh họa 17 keypoints của Human Pose.Source: learnopencv.com
 Mỗi lần phân loại, chúng ta sử dụng 32 frames liên tiếp nhau. Như vậy thì kích thước dữ liệu của một Input Data là 32x34:
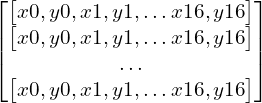
 Hình 5 - Ma trận dữ liệu đầu vào của model nhận diện Human Pose.Source: learnopencv.com
!head -2 RNN-HAR-2D-Pose-database/X_train.txt---295.914,161.579,307.693,203.413,281.546,203.368,274.997,251.562,267.194,293.253,337.619,204.669,347.958,255.443,341.541,295.866,286.81,289.393,297.196,355.832,297.22,405.371,321.967,291.959,327.143,358.408,328.528,411.922,294.546,156.42,305.002,156.418,0,0,318.083,161.632295.855,161.6,307.684,203.408,281.529,203.385,274.989,251.574,267.191,291.961,337.615,204.646,347.974,254.209,344.093,295.816,286.803,289.377,297.165,355.827,297.205,404.095,323.248,290.652,324.564,358.409,328.493,410.63,293.252,157.686,303.706,157.706,0,0,318.024,161.654
Bởi vì OpenPose kết quả là 18 Keypoints, trong khi kết quả của Detectron2 chỉ có là 17 Keypoints nên chúng ta sẽ phải thực hiện bước chuyển đổi trước khi sử dụng bộ dữ liệu này.
WINDOW_SIZE = 32 # 32 continuous framesclass PoseDataset(Dataset): def __init__(self, X, Y): self.X = X self.y = Y def __len__(self): return len(self.y) def __getitem__(self, idx): return self.X[idx], self.y[idx]openpose_to_detectron_mapping = [0, 1, 28, 29, 26, 27, 32, 33, 30, 31, 8, 9, 2, 3, 10, 11, 4, 5, 12, 13, 6, 7, 20, 21, 14, 15, 22, 23, 16, 17, 24, 25, 18, 19]class PoseDataModule(pl.LightningDataModule): def __init__(self, data_root, batch_size): super().__init__() self.data_root = data_root self.batch_size = batch_size self.X_train_path = self.data_root + "X_train.txt" self.X_test_path = self.data_root + "X_test.txt" self.y_train_path = self.data_root + "Y_train.txt" self.y_test_path = self.data_root + "Y_test.txt" # Detectron2 produces only 17 key points while OpenPose produces 18 (or more) key points. def convert_to_detectron_format(self, row): row = row.split(',') # filtering out coordinate of neck joint from the training/validation set originally generated using OpenPose. temp = row[:2] + row[4:] # change to Detectron2 order of key points temp = [temp[i] for i in openpose_to_detectron_mapping] return temp def load_X(self, X_path): file = open(X_path, 'r') X = np.array( [elem for elem in [ self.convert_to_detectron_format(row) for row in file ]], dtype=np.float32 ) file.close() blocks = int(len(X) / WINDOW_SIZE) X_ = np.array(np.split(X, blocks)) return X_ # Load the networks outputs def load_y(self, y_path): file = open(y_path, 'r') y = np.array( [elem for elem in [ row.replace(' ', ' ').strip().split(' ') for row in file ]], dtype=np.int32 ) file.close() # for 0-based indexing return y - 1 def prepare_data(self): pass def setup(self, stage=None): X_train = self.load_X(self.X_train_path) X_test = self.load_X(self.X_test_path) y_train = self.load_y(self.y_train_path) y_test = self.load_y(self.y_test_path) self.train_dataset = PoseDataset(X_train, y_train) self.val_dataset = PoseDataset(X_test, y_test) def train_dataloader(self): # train loader train_loader = torch.utils.data.DataLoader( self.train_dataset, batch_size=self.batch_size, shuffle=True ) return train_loader def val_dataloader(self): # validation loader val_loader = torch.utils.data.DataLoader( self.val_dataset, batch_size=self.batch_size, shuffle=False ) return val_loader
3. Xây dựng mô hình
3.1 Human Pose Estimation model
Phần này, ta sử dụng pre-trained R50-FPN model từ Detectron2 Model Zoo.
# obtain detectron2's default configcfg = get_cfg()# load the pre trained model from Detectron2 model zoocfg.merge_from_file(model_zoo.get_config_file("COCO-Keypoints/keypoint_rcnn_R_50_FPN_3x.yaml"))# set confidence threshold for this modelcfg.MODEL.ROI_HEADS.SCORE_THRESH_TEST = 0.5 # load model weightscfg.MODEL.WEIGHTS = model_zoo.get_checkpoint_url("COCO-Keypoints/keypoint_rcnn_R_50_FPN_3x.yaml")# create the predictor for pose estimation using the configpose_detector = DefaultPredictor(cfg)
3.2 Định nghĩa LSTM model
LSTM model được khởi tạo với hidden_dim = 50, optimizer là Adam và sử dụng ReduceLROnPlateau scheduler để giảm learning_rate. Ở đây, mình chỉ sử dụng 1 LSTM layer, bạn có thể thí nghiệm với nhiều LSTM layers hơn.
# We have 6 output action classes.TOT_ACTION_CLASSES = 6#lstm classifier definitionclass ActionClassificationLSTM(pl.LightningModule): # initialise method def __init__(self, input_features, hidden_dim, learning_rate=0.001): super().__init__() # save hyperparameters self.save_hyperparameters() # The LSTM takes word embeddings as inputs, and outputs hidden states # with dimensionality hidden_dim. self.lstm = nn.LSTM(input_features, hidden_dim, num_layers=2, batch_first=True) # The linear layer that maps from hidden state space to classes self.linear = nn.Linear(hidden_dim, TOT_ACTION_CLASSES) def forward(self, x): # invoke lstm layer lstm_out, (ht, ct) = self.lstm(x) # invoke linear layer return self.linear(ht[-1]) def training_step(self, batch, batch_idx): # get data and labels from batch x, y = batch # reduce dimension y = torch.squeeze(y) # convert to long y = y.long() # get prediction y_pred = self(x) # calculate loss loss = F.cross_entropy(y_pred, y) # get probability score using softmax prob = F.softmax(y_pred, dim=1) # get the index of the max probability pred = prob.data.max(dim=1)[1] # calculate accuracy acc = torchmetrics.functional.accuracy(pred, y) dic = { 'batch_train_loss': loss, 'batch_train_acc': acc } # log the metrics for pytorch lightning progress bar or any other operations self.log('batch_train_loss', loss, prog_bar=True) self.log('batch_train_acc', acc, prog_bar=True) #return loss and dict return {'loss': loss, 'result': dic} def training_epoch_end(self, training_step_outputs): # calculate average training loss end of the epoch avg_train_loss = torch.tensor([x['result']['batch_train_loss'] for x in training_step_outputs]).mean() # calculate average training accuracy end of the epoch avg_train_acc = torch.tensor([x['result']['batch_train_acc'] for x in training_step_outputs]).mean() # log the metrics for pytorch lightning progress bar and any further processing self.log('train_loss', avg_train_loss, prog_bar=True) self.log('train_acc', avg_train_acc, prog_bar=True) def validation_step(self, batch, batch_idx): # get data and labels from batch x, y = batch # reduce dimension y = torch.squeeze(y) # convert to long y = y.long() # get prediction y_pred = self(x) # calculate loss loss = F.cross_entropy(y_pred, y) # get probability score using softmax prob = F.softmax(y_pred, dim=1) # get the index of the max probability pred = prob.data.max(dim=1)[1] # calculate accuracy acc = torchmetrics.functional.accuracy(pred, y) dic = { 'batch_val_loss': loss, 'batch_val_acc': acc } # log the metrics for pytorch lightning progress bar and any further processing self.log('batch_val_loss', loss, prog_bar=True) self.log('batch_val_acc', acc, prog_bar=True) #return dict return dic def validation_epoch_end(self, validation_step_outputs): # calculate average validation loss end of the epoch avg_val_loss = torch.tensor([x['batch_val_loss'] for x in validation_step_outputs]).mean() # calculate average validation accuracy end of the epoch avg_val_acc = torch.tensor([x['batch_val_acc'] for x in validation_step_outputs]).mean() # log the metrics for pytorch lightning progress bar and any further processing self.log('val_loss', avg_val_loss, prog_bar=True) self.log('val_acc', avg_val_acc, prog_bar=True) def configure_optimizers(self): # adam optimiser optimizer = optim.Adam(self.parameters(), lr=self.hparams.learning_rate) # learning rate reducer scheduler scheduler = optim.lr_scheduler.ReduceLROnPlateau(optimizer, mode='min', factor=0.5, patience=10, min_lr=1e-15, verbose=True) # scheduler reduces learning rate based on the value of val_loss metric return {"optimizer": optimizer, "lr_scheduler": {"scheduler": scheduler, "interval": "epoch", "frequency": 1, "monitor": "val_loss"}}
4. Huấn luyện mô hình
Sử dụng ModelCheckpoint callback và LearningRateMonitor, ta sẽ huấn luyện mạng LSTM như sau:
def do_training_validation(): pl.seed_everything(21) parser = ArgumentParser() parser = pl.Trainer.add_argparse_args(parser) parser = configuration_parser(parser) # args = parser.parse_args() args, unknown = parser.parse_known_args() # init model hidden_dim = 50 WINDOW_SIZE = 32 model = ActionClassificationLSTM(WINDOW_SIZE, hidden_dim, learning_rate=args.learning_rate) data_module = PoseDataModule(data_root=args.data_root, batch_size=args.batch_size) #save only the top 1 model based on val_loss checkpoint_callback = ModelCheckpoint(save_top_k=1, monitor='val_loss') lr_monitor = LearningRateMonitor(logging_interval='step') #trainer trainer = pl.Trainer.from_argparse_args(args, # fast_dev_run=True, max_epochs=args.epochs, deterministic=True, gpus=1, progress_bar_refresh_rate=1, callbacks=[EarlyStopping(monitor='train_loss', patience=15), checkpoint_callback, lr_monitor]) trainer.fit(model, data_module) return model
Kết quả huấn luyện model:
- Train Accuracy:
 Hình 5 - Training Accuracy Chart.
 - Train Loss:
 Hình 6 - Training Loss Chart.
 - Validation Accuracy:
 Hình 7 - Validation Accuracy Chart.
 - Validation Loss:
 Hình 8 - Validation Loss Chart.
5. Thực hiên Inference
Sau khi đã train xong model thì ta sẽ thử sử dụng nó để thực hiện nhận diện các hành động như trong tập huấn luyện.
# how many frames to skip while inferencing# configuring a higher value will result in better FPS (frames per rate), but accuracy might get impactedSKIP_FRAME_COUNT = 1# analyse the videodef analyse_video(pose_detector, lstm_classifier, video_path): # open the video cap = cv2.VideoCapture(video_path) # width of image frame width = int(cap.get(cv2.CAP_PROP_FRAME_WIDTH)) # height of image frame height = int(cap.get(cv2.CAP_PROP_FRAME_HEIGHT)) # frames per second of the input video fps = int(cap.get(cv2.CAP_PROP_FPS)) # total number of frames in the video tot_frames = int(cap.get(cv2.CAP_PROP_FRAME_COUNT)) # video output codec fourcc = cv2.VideoWriter_fourcc(*'mp4v') # extract the file name from video path file_name = ntpath.basename(video_path) # video writer vid_writer = cv2.VideoWriter('res_{}'.format( file_name), fourcc, 30, (width, height)) # counter counter = 0 # buffer to keep the output of detectron2 pose estimation buffer_window = [] # start time start = time.time() label = None # iterate through the video while True: # read the frame ret, frame = cap.read() # return if end of the video if ret == False: break # make a copy of the frame img = frame.copy() if(counter % (SKIP_FRAME_COUNT+1) == 0): # predict pose estimation on the frame outputs = pose_detector(frame) # filter the outputs with a good confidence score persons, pIndicies = filter_persons(outputs) if len(persons) >= 1: # pick only pose estimation results of the first person. # actually, we expect only one person to be present in the video. p = persons[0] # draw the body joints on the person body draw_keypoints(p, img) # input feature array for lstm features = [] # add pose estimate results to the feature array for i, row in enumerate(p): features.append(row[0]) features.append(row[1]) # append the feature array into the buffer # not that max buffer size is 32 and buffer_window operates in a sliding window fashion if len(buffer_window) < WINDOW_SIZE: buffer_window.append(features) else: # convert input to tensor model_input = torch.Tensor(np.array(buffer_window, dtype=np.float32)) # add extra dimension model_input = torch.unsqueeze(model_input, dim=0) # predict the action class using lstm y_pred = lstm_classifier(model_input) prob = F.softmax(y_pred, dim=1) # get the index of the max probability pred_index = prob.data.max(dim=1)[1] # pop the first value from buffer_window and add the new entry in FIFO fashion, to have a sliding window of size 32. buffer_window.pop(0) buffer_window.append(features) label = LABELS[pred_index.numpy()[0]] #print("Label detected ", label) # add predicted label into the frame if label is not None: cv2.putText(img, 'Action: {}'.format(label), (int(width-400), height-50), cv2.FONT_HERSHEY_COMPLEX, 0.9, (102, 255, 255), 2) # increment counter counter += 1 # write the frame into the result video vid_writer.write(img) # compute the completion percentage percentage = int(counter*100/tot_frames) # return the completion percentage # yield "data:" + str(percentage) + "\n\n" # show video results cv2.imshow("image", img) # Press Q on keyboard to exit if cv2.waitKey(25) & 0xFF == ord('q'): break
Kết quả thực hiện trên video:
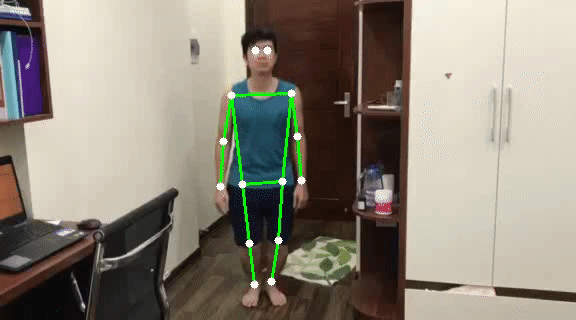 Hình 9 - Kết quả thực hiện Inference.
6. Kết luận
Trong bài này, chúng ta cùng nhau thực hành xây dựng một mô hình để nhận diện hành động của người trong video bằng cách sử dụng kết hợp giữa Detectron2 cho Pose Estimation và LSTM cho phân loại. Có rất nhiều thứ ta có thể cải tiến để có được kết quả tốt hơn mà bạn có thể thử nếu áp dụng vào bài toán thực tế:
- Tăng FPS để chúng ta có thể chạy được realtime: Tối ưu hóa model (pruning, quantization), loại bỏ frame khi nhận diện, sử dụng multi-threading, ...
- Để sử dụng các Pose Estimation model khác như AlphaPose, OpenPose, ...
Toàn bộ source code của bài này, các bạn có thể xem tại đây


![Chứng chỉ PMP là gì? Mọi thông tin về chứng chỉ PMP [2023]](https://d3hi6wehcrq5by.cloudfront.net/itnavi-blog/posts/small/a2faf23faa39582d7810b6fc7ba9896c.jpg?v=1693281611)


